I’ve adapted this from what my Grandmother did over the years and now use Gluten Free Pasta to make it safe for us. I never measured anything though for this, as that’s how my Grandmother did it, so I’m giving approximate measurements and you can tweak the spices to your liking!
I can usually have this on the dinner table in about 20-25 minutes from start to finish! Who needs that jarred stuff!
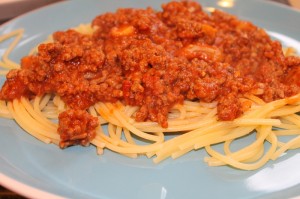
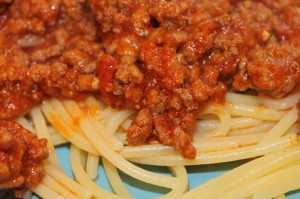
Gluten Free Spaghetti
Meat Sauce Ingredients:
- About 1.5 pounds Ground Beef (turkey, etc, you can even skip this!)
- 1 can Tomato Sauce
- 1 can of mushrooms
- About 1/3 cup water
- About 1/2 small yellow onion chopped fine
- About 2 stalks celery
- About 1-2 cloves of garlic
- About 1-2 teaspoons dried oregano to taste
- Salt & Pepper to taste
For the pasta, my favorite is Schar Pasta. It’s texture is very close to ‘regular’ pasta and the kids don’t even know the difference! I like to get this pack of 5 on Amazon as the price is great and I always have enough pasta around then. Schar Naturally Gluten-Free Spaghetti, 12-Ounce Packages (Pack of 5)
First start the water to boil while putting together the sauce. Heat a large frying pan, add a layer of salt and pepper. Add the ground beef when it’s hot and brown the beef. I like to more add salt and pepper onto the ground beef while it’s cooking and before I turn it. Once brown, drain away any fat in the pan. Add the can of tomato sauce and the water. Use as much or as little water depending on how thick you like it. It will cook down and get thicker so keep that in mind. Also add the celery, mushrooms, garlic, onion and oregano. Cover and allow this to simmer on low.
Usually by this time the water is boiling so you can add the pasta and cook (the one I get takes 11 minutes). Be sure to follow the directions on the package and taste test before deciding the pasta is done! I like to taste test the sauce as the pasta is cooking and add more salt or pepper as needed or any of the other spices.
Serve with freshly grated Parmesan cheese. We’ve been skipping the packaged stuff here because of the risk of fillers and just getting a wedge of Parmesan cheese and grating it ourselves. This is working well and the kids love putting it on their spaghetti!
When I make this for dinner, the dinner table is quiet because the kids are gobbling this up!
TIP: Double the recipe and freeze or refrigerate the leftovers! This sauce warms back up very nicely.
TIP: I like to keep dried chopped onion and dried celery flakes on hand in case I don’t have either of these fresh. They are a good substitute but you get the full flavor if you cook with these as fresh vegetables.
Note: I have tried fresh mushrooms before and it just didn’t turn out as good. There’s something about the salty canned mushrooms! You can try fresh if you like though!
Enjoy!
Gluten Free Spaghetti